Workshop Tutorial
One goal of the RaspiBlitz project is to provide an open DIY platform for workshops - to setup your own full node and learn to manage it. This tutorial is collecting best practices on how to organize a RaspiBlitz workshop.
Time Planning
First thing on planning a RaspiBlitz workshop is to calculate the time needed correctly. For example, the setup from scratch with no further support is still a weekend project - mostly because downloading and syncing the blockchain takes a lot of time.
So the time required for the workshop all depends on the preparation you as a workshop organizer are interested to provide ahead of the workshop. If you already provide an up-2-date copy of the blockchain for each participant thats the biggest time saver.
Note that the time estimates below are about getting a node to a "clean setup". They do not include the funding & setting up channels process - which is adding an additional hours to the calculation und could become quite costly in a high transaction fee environment on mainnet.
Also, if your group is lager then 5 participants, calculate some extra time for individual support. You can compensate for that if you let two participants work together on one RaspiBlitz setup; this way you limit individual support and let them help each other.
Checklist for Running a Workshop
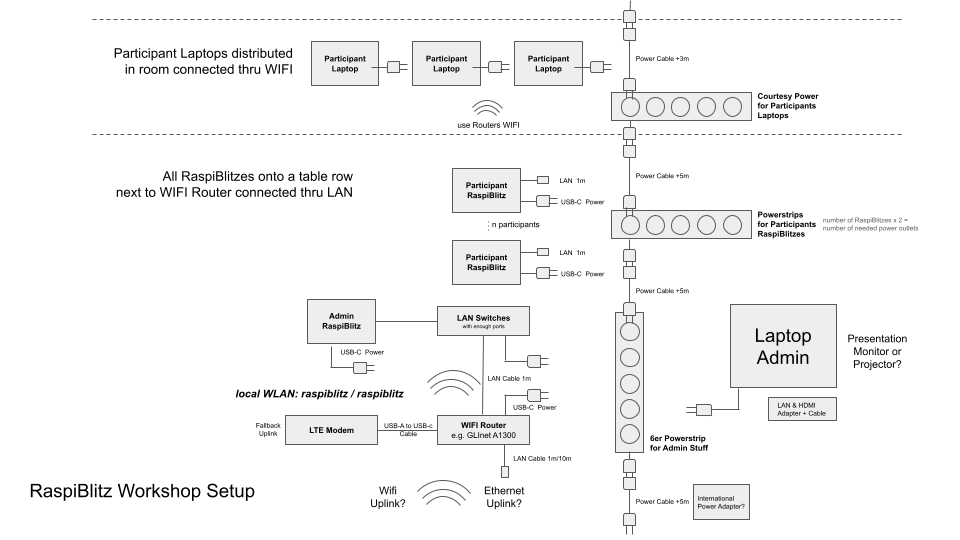
Make sure you have the following hardware and infrastructure ready for the workshop:
- Lots of 'multiple power outlets/extensions' (minimum outlets: number of RaspiBlitzes x 2 plus 6)
- Network-Switch with enough ports (min. 1 per RaspiBlitz)
- Enough LAN network cables (short ones to connect the RaspiBlitzes)
- Good internet connection at location with LAN port (or a WLAN to LAN adapter)
- Extra WLAN Router (if you are not sure if LAN & WLAN is not on the same network at location)
- One or two USB SD card adapters
- One or two USB-C to USB-A adapters
- Some Tape, Markers & Pens always come in handy (also for participants to write down seeds & passwords)
- Potentially some bitcoin funds or hardware wallets (just if you want to make demos)
The location should provide a big TV or projector for you to guide the workshops with slides and examples.
Participants need to bring at least their laptops.
Workshop Scenario: Provide a RaspiBlitz Hardware-Kit
Estimated Duration: 3 Hours
In this workshop scenario you buy all the hardware but let participants assemble the RaspiBlitz themselves - that's half the fun and people get a feel for the gear. But to keep the blockchain sync time short and be able to keep in a 3 hour time frame you need to prepare the HDDs (or NVMes) with blockchain data not much older than one or two days. Start ordering the parts at least one week before the workshop (budget is needed) and reserve the day before the workshop completely for creating copies of the blockchain .
Next we go thru all the major preparation steps:
Buy all the Hardware
See the shopping list in the RaspiBlitz documentation. You need to buy all of those, and every participant also needs a short (about 1m) network cable.
From experience start ordering two weeks before the workshop - even if you have Amazon Prime. There is always a shipment coming late, and it's a lot of packages.
If you like to support the RaspiBlitz project you can order a complete RaspiBlitz workshop set from raspiblitz.com
Prepare Blockchain Data
This is the most time consuming part of the preparation. Try it once to get a feel for how much time you need to prepare one copy of a blockchain.
The most effective way to create multiple copies of the blockchain for the participants is to get a NVMe cloning device like this one: https://www.amazon.com/-/dp/B09LHLBWD4
Then you setup one RaspiBlitz (just install Bitcoin - no lightning need) and have iut fully synced the day before the day of the workshop. Then you SSH into the device and choose: SSHMAINMENU > REPAIR > RESET-HDD (Delete HDD data but keep Blockchain data). After your RaspiBlitz shutsdown you have a clean NVMe with the blockchain data that you can use as template (source) with your NVMe cloing device.
If you need to update your template blockchain - setup a new RaspiBlitz with it like above, let it sync up and then RESET-HDD again.
Prepare SD Cards with Latest RaspiBlitz Image
Download the latest RaspiBlitz SD card image from the README page. Balena Etcher is the best image writing software for this use case because if you have multiple sd card adapters, you can write multiple cards at once,cutting down your preparation time.
Setup Workshop Environment
The room setup is also something to keep in mind. The easiest way is to choose one corner of the room where you place your WIFI router and setup a switch there so that participants can connect their RaspiBlitz with LAN & power once assembled. Then they write down their assigned IP they read on the LCD and continue from their laptop. The laptop can be used at any place in the room and connects thru the WIFI to the RaspiBlitz.
Running of the Workshop
The basic structure of the workshop is set by the RaspiBlitz setup process. Simply follow that. The following parts should share some experiences and suggestions on how you can optimize the time and mentoring during this process. Feel free to share your experience here.
Welcome and Intro
In the beginning, it's great to give a small introduction to the Lightning Network and show the RaspiBlitz documentation & GitHub page to let everybody know where to find the basic info. But try to keep it around 10 min, in order to not waste time.
Assembling
Its time to to put the single hardware parts together. Try to go step by step thru the process and best to show example pictures as slides.
Basic Setup
Connect everybody's laptop to the same local network the RaspiBlitzes are connected to. Be prepared to explain how to open a terminal - Windows users especially need some help here (see README on this).
Then everybody starts with the RaspiBlitz setup. Its best to do the setup together - showing the single steps on the projector for the participants to follow. Use the WebUI for setup (Bitcoin + LND), but if time also demo the SSH login later and mention that it provides more options if needed. Hand out paper and pens for people to write down their passwords and wallet seeds.
Waiting Time
After the lightning wallet setup comes the longest waiting time during the workshop - around 30 min. It's the time when the node is syncing up the blockchain and LND is scanning. If you see someone's blockchain progress under 95%, something is wrong - possibly the HDD was not correctly prepared or the blockchain data it might be too old to finish during workshop.
Depending on your workshops internet uplink connection sync behind Tor might be slow or blocked. Check options to let bitcoin sync thru clearnet (Tor switched off) if you detect a slow sync with your participants.
Use this time for a more in-depth educational segment on Bitcoin & Lightning in general. This time can also be used to demo with one RaspiBlitz that is already on clean-setup (you prepared before the workshop) how the funding, setting up channels and the other features of the RaspiBlitz work. That way people see what are the next steps once their node is ready and even if your workshop time is over by then they can know the next steps to do at home.
Also this time is good for troubleshooting in individual sessions. If someone is not able to finish the sync on location in time shutdown the RaspiBlitz from SSH terminal with CTRL+C and then shutdown now. If the device gets connected to the internet again at home it should pickup the sync/scan process (let people know about the wallet unlock).
Finalizing Setup
Once the RaspiBlitz is ready (LCD shows status screen) and people can open the main menu, let them go and install a demo app. Mempool is nice to explore the users personal blockain copy or RTL to see more lightning options.
Funding, Channels, API
If you have much more time and the funds to experiment you can use RTL to go thru the next steps of connecting to peers, funding and opening channels. While you wait on funding or channel opening confirmations, its a good moment to try to connect users mobile wallets with the device. But just so that on the local network for demo - dynamicDNS is something people then can try at home with port forwarding on their routers.
Its also nice to add casual social open-end segment to the end of the workshop. So people can already go into personal conversations, music and beverages while some last nodes sync up, confirmations come in and people sending their first satoshis on some lightning chess or from node to node.
Here are some videos that show what else is possible with the RaspiBlitz: