Storage Migration Guide
This guide documents - step by step - how to perform a storage migration (moving your RaspiBlitz data & blockchain to a new & bigger drive) without reinstalling the node from scratch with RaspiBlitz v1.12 (or higher) on a Raspberry Pi 5 (or higher).
Contents
-
Migration scenarios
-
Hardware & adapter requirements
-
What gets migrated
-
Safety & backup checklist
-
Preparation — Shutdown, Swap Drive & new SD
-
Migration — Boot & Copy Data
1. Migration scenarios
All three scenarios are possible; you only need the matching adapters (see below):
- SATA‑USB SSD → bigger SATA‑USB SSD
- SATA‑USB SSD → bigger NVMe
- NVMe → bigger NVMe
These work on Raspberry Pi 5 (recommended for NVMe). Scenario 1 (SATA‑USB → SATA‑USB) also works on Raspberry Pi 4.
2. Hardware & adapter requirements
To copy the data from the old to the new drive - 2 drives need to be connected at the same time to your RaspberryPi. So depending on your scenario you need to choose the matching adapter.
A) NVMe on Raspberry Pi 5
- NVMe → NVMe: You’ll need a USB→NVMe adapter/enclosure for the second NVMe during migration (the primary NVMe sits on the Pi 5 NVMe baseboard - something like this: https://www.amazon.de/dp/B0CB7MGWGQ
B) SATA SSDs (2.5") on Raspberry Pi 5 or 4
- SATA‑USB → SATA‑USB (Pi 5 or Pi 4): Use your existing USB 3.0 SATA enclosure/adapter(s).
Power nuance:- On Pi 5, a bus‑powered USB 3.0 SATA adapter is generally fine for the additional drive.
- On Pi 4, if two SSDs are attached simultaneously, the second SSD should be additionally powered (e.g., powered dock, Y‑cable, or enclosure with its own power). In tests this powered dock worked fine: https://www.amazon.de/dp/B016UBXH3O
C) Special case — SATA‑USB SSD → NVMe on Raspberry Pi 5
- You do not need to buy an extra migration adapter. You already need the Pi 5 NVMe baseboard for normal operation; install the new NVMe on that baseboard as the primary/target. Keep your old SATA SSD in its existing USB SATA adapter as the secondary/source.
- On Pi 5, the SATA USB adapter does not need extra power for this migration.
- The powered‑adapter requirement applies only to Pi 4 when two SSDs are connected at the same time (see section B).
4. What gets migrated
- Bitcoin Core data (blockchain, indexes, configuration)
- Lightning data (LND or CLN—whichever you run)
- RaspiBlitz configuration and relevant service data (e.g., web UIs/tools)
5. Safety & backup checklist
Even if you’re “just” swapping drives, back up before you migrate. This protects you against copy errors, power glitches, etc.
Recommended (preferred):
- RaspiBlitz migration bundle ("Migration Download") — export the full migration package for your setup.\
- Lightning rescue backup depending on your LN implementation:
- LND: ensure you have a fresh Static Channel Backup (SCB) and store it off‑device.
- Core Lightning (CLN): create the rescue backup via RaspiBlitz (the CLN equivalent), and store it off‑device.\
- Optionally copy TLS certificates and macaroons (can simplify API access after migration).
Absolute minimum (at least do this):
- Your on‑chain wallet seed words (24 words), correctly noted and verified.
- For LND, a recent SCB stored safely off the node. For CLN, the respective rescue backup.
Side note: If the node holds no funds (no on‑chain balance, no open channels), the backup urgency is lower. Still, it’s good practice to keep basic backups—especially if the device hosts any critical services.
6. Preparation — Clean shutdown, hardware swap and SD‑card refresh (mandatory)
Do not copy data while the node is running. Shut down cleanly, then place the new, larger drive in the primary position, prepare the old drive as the secondary/source, refresh the microSD, and only then proceed.
1) Clean shutdown
- From RaspiBlitz UI: Shutdown\
- From shell (preferred on RaspiBlitz):
The
OFFOFFcommand triggers RaspiBlitz’s safe shutdown routine. - Standard Linux alternative:
sudo shutdown -h now
Wait until LEDs indicate the system is fully off.
2) Promote the new drive to primary
After the system is off, swap the roles of the drives so that the new, larger drive becomes the primary/target and the old drive becomes the secondary/source attached over USB (but don’t plug it in yet — see Final Prep below).
Scenario A — NVMe → NVMe (Raspberry Pi 5)
- Remove the old 1 TB NVMe from the Pi 5 NVMe baseboard.
- Install the new 2 TB NVMe onto the NVMe baseboard (now primary/target).
Check form factor (e.g., 2280) and keying; use the standoff/screw. - Place the old 1 TB NVMe into a USB→NVMe adapter/enclosure (this will be secondary/source).\
Scenario B — SATA‑USB SSD → SATA‑USB SSD (Raspberry Pi 5 or Pi 4)
- Remove the old 1 TB 2.5" SSD from your main USB 3.0 SATA enclosure/adapter.
- Insert the new 2 TB 2.5" SSD into that main enclosure/adapter (now primary/target).
- Put the old 1 TB SSD into your second USB 3.0 SATA adapter/dock (this will be secondary/source).
- On Pi 5, bus‑powered is typically fine.
- On Pi 4, the secondary/source should be additionally powered (powered dock/Y‑cable).\
Scenario C — SATA‑USB SSD → NVMe (Raspberry Pi 5)
No extra migration adapter needed:
- Install the new 2 TB NVMe on the Pi 5 NVMe baseboard (primary/target).
- Place the old 1 TB SATA SSD in its existing USB 3.0 SATA adapter (this will be secondary/source).\
3) Refresh the microSD with a clean RaspiBlitz image (recommended)
With the Pi powered off, remove the microSD card and flash a fresh RaspiBlitz image — at least v1.12, or a newer release if available.
Why now? Doing this between shutdown and the copy avoids filesystem surprises and ensures you’ll boot into a clean userspace for the migration steps.
Capacity & rollback recommendation:
- Upgrade to a 64 GB microSD. Older installs often used 32 GB; moving to 64 GB provides more headroom for logs and updates.
- Use a second, new microSD for this update. Keep your existing microSD untouched as a fallback. If anything goes wrong during migration, you can re‑insert the old microSD and the old drive to boot the node back in its previous state.
- (Optional but helpful) Choose a UHS‑I A1/A2‑rated card from a reputable brand for better I/O consistency.
Steps (summary):
- Remove the microSD from the Pi.
- Download the latest RaspiBlitz image (>= v1.12).\
- Flash the image to the new 64 GB microSD using your preferred tool like balenaEtcher : https://etcher.balena.io\
- Safely eject the card and re‑insert into the Pi (leave the Pi powered off until the copy setup is ready).
4) Final prep — seat the old drive in its adapter, but do NOT connect yet
As the last preparation step of Preparation, seat the old (source) drive in its adapter — but do not plug it into the Raspberry Pi yet.
Why this matters
- Avoids accidental boot from the old drive or confusing device order at first power‑on.
- Ensures the Pi boots cleanly from the fresh microSD and recognizes the new primary/target drive first.
- Prevents early automounts that might interfere with partitioning and mount configuration.
What to do
- Place the old drive into the corresponding adapter:
- NVMe source: slide into the USB→NVMe enclosure (leave its USB cable unplugged).
- SATA source (2.5" SSD): attach to the USB 3.0 SATA adapter/dock (leave its USB cable unplugged; on Pi 4, attach external power to the dock only when instructed later).
- Route the cable so it’s ready, but keep the USB end disconnected from the Pi.
7. Migration — Boot with the new SD (old drive still disconnected) & prepare the target drive
In this step you start the Raspberry Pi/RaspiBlitz using the fresh 64 GB microSD you flashed in Preparation. Make sure the old/source drive is NOT connected yet. Only the new/target drive should be present (NVMe on the Pi 5 baseboard, or the new SATA SSD in the main USB enclosure).
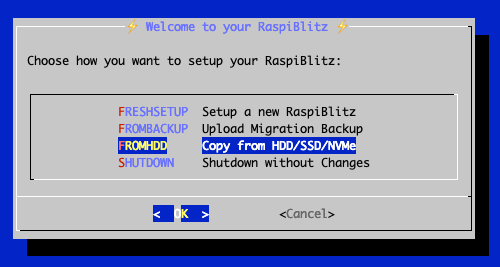
2.1 Boot from the new microSD & open setup (via SSH)
When the setup menu opens in your terminal session, choose: From HDD → Copy from HDD/SSD/NVMe. This is the migration entry that initiates copying data from your old/source drive to the new/target drive.
2.2 Connect the old/source drive (USB 3.0 blue ports)
- Now plug the adapter with the old drive into a USB 3.0 port on the Raspberry Pi. These ports are typically marked with blue plastic.
- Avoid USB 2.0 (black) ports — they are slower and may cause timeouts during large transfers.
- If you’re on a Raspberry Pi 4 and using two SATA SSDs, ensure the second (source) SSD has additional power (powered dock/Y‑cable), as noted in the adapter section.
Back in the migration dialog (Migrate Data):
- Select Start migration to begin the copy process from the just‑connected source to the target.
Only if the old drive is not detected:
- Re‑check all physical connections: Is the drive fully seated in the adapter? Is the adapter firmly connected to a USB 3.0 (blue) port? For NVMe, is the module correctly keyed and screwed down? For SATA, is the connector fully engaged?
- On a Raspberry Pi 4, ensure the source SSD/adapter has additional power (powered dock or Y‑cable), as noted earlier.
- Make sure that the new bigger drive is empty with no partitions
Worst-Case Fallback: If it still won’t show up, disconnect power, put the old microSD and the old drive back into their original places, and boot the system to restore the previous state. You can then investigate and retry the migration later.
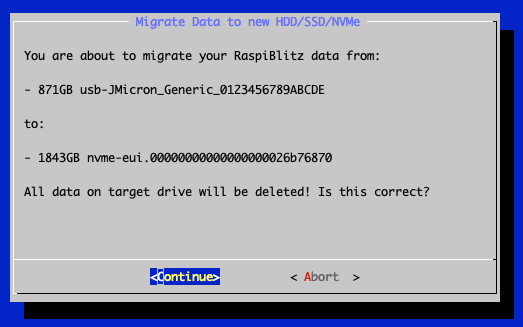
Normally you will see a dialog showing the old & the new drive and if all looks good, choose continue.
2.3 After selecting Continue
- The wizard may ask for basic restore/setup details (e.g., password confirmation, regional options). Follow the prompts.
- Once confirmed, the copy process starts.
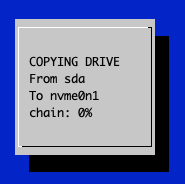
2.4 What to expect during copying
- Duration depends on disk speed and data size; several hours is normal for full nodes.
- In the terminal you’ll see progress updates; on the hardware you’ll usually see activity LEDs blinking while data is copied.
- It’s common to see phases (e.g., blockchain first, then Lightning/service data). As a result, the percentage may jump or pause—that’s normal.
- Avoid disconnecting power or cables until the process completes.
2.5 Before the final reboot: remove the old/source drive
- After the copy and remaining system install finish and the wizard prompts for a reboot, unplug the old drive/adapter from USB before continuing.
- This avoids accidentally booting from or auto‑mounting the old disk and ensures the Pi starts with the new target drive only.
- On Pi 4 with powered docks/Y‑cables, also switch off/undo the extra power to the source dock.
- Then proceed with Reboot in the wizard.
