FAQ
Upgrade
How to verify the SD card image after download?
There are two methods, verify the hash (proves integrity) or the signature (proves integrity and authenticity)
You can do a quick check to verify that the sha256 hash of the file you downloaded is the same as the sha256 hash mentioned below the download link, or use the torrent download which will also check the file for a checksum after download.
To verify the shasum:
shasum -a 256 [DOWNLOADED-FILE-TO-CHECK]
But verifying the shasum does not prove to you that the SD card image was actually built by the lead developer of the RaspiBlitz project.
To verify that the download was actually signed by rootzoll (FINGERPRINT: 92A746AE33A3C186D014BF5C1C73060C7C176461) you need to use GPG and import the following public key:
curl --tlsv1.2 --proto '=https' https://keys.openpgp.org/vks/v1/by-fingerprint/92A746AE33A3C186D014BF5C1C73060C7C176461 | gpg --import
Next, download the "signature file" for the SD card image. It's the same download link as for the image file - just added a .sig at the end. You should also always find the download link for the signature file in the README right next to the image download link.
If you now have all the three elements needed - the imported public key, the image signature and the image file itself - you can verify the download with:
gpg --verify [SIGNATURE-FILE] [IMAGE-FILE]
As a result you should see a "good signature" message with a main fingerprint that is ending on 1C73 060C 7C17 6461. You should also see the sub-key fingerprint ending on AA9D D1B5 CC56 47DA, that is used at the moment to sign the SD card image. If those fingerprints shown correctly, the SD card image you downloaded is an original RaspiBlitz release.
You can ignore any warning about the key being 'not a trusted signature' or untrusted .. as long you see "good signature" and the correct main & sub fingerprints the download is valid.
What changed on every upgrade?
See the CHANGES.md file for details.
How do I upgrade my RaspiBlitz?
The upgrade should be quite simple - you don't need to close any channels:
- It would be best to get a second 64GB SD card - but you can also reuse your old one
- In the SSH main menu of you RaspiBlitz choose
UPDATE& follow the dialogs until shutdown - Download the new RaspiBlitz image file from the GitHub README
- Write the new image to the (new) SD card with a tool like balena etcher
- Start the RaspiBlitz with the new SD card image - it now goes through a recover/update phase - this may take some time.
- Once that's done, login once via SSH and use the password 'raspiblitz' and set a new password A (can be your old one or a new one).
After the final reboot your RaspiBlitz should be ready, running the new RaspiBlitz version.
Why do I need to re-burn my SD card for an update?
I know it would be nicer to run just an update script and be ready to go. But then the scripts would need to be written in a much more complex way to be able to work with any versions of LND and Bitcoind (they are already complex enough with all the edge cases) and testing would become even more time-consuming than it is now. That's not something that a single developer can deliver.
For some, it might be a pain point to make an update by re-burning a new SD card - especially if you added your own scripts or made changes to the system - but that's by design. It's a way to enforce a "clean state" with every update - the same state that I tested and developed the scripts with. The reason for that pain: I simply cannot write and support scripts that run on every modified system forever - that's simply too much work.
With the SD card update mechanism I reduce complexity, I deliver a "clean state" OS, LND/Bitcoind and the scripts tightly bundled together exactly in the dependency/combination like I tested them and it's much easier to reproduce bug reports and give support that way.
Of course, people should modify the system, add own scripts, etc ... but if you want to also have the benefit of the updates of the RaspiBlitz, you have two ways to do it:
-
Contribute your changes back to the main project as pull requests so that they become part of the next update - the next SD card release.
-
Make your changes so that they survive an SD card update easily - put all your scripts and extra data onto the HDD, AND document for yourself how to activate them again after an update. The file
/mnt/hdd/app-data/custom-installs.shruns with sudo rights after an update/recovery from a fresh SD card. This is the place to put all the install commands, cronjobs or editing of system configs for your personal modifications of RaspiBlitz.
BTW there is a beneficial side effect when updating with a new SD card: You also get rid of any malware or system bloat that happened in the past. You start with a fresh system :)
How can I update LND or Bitcoind even before the next RaspiBlitz update?
Try updating before a official RaspiBlitz at your own risk - you can find some info about that here: https://raspibolt.org/bonus/raspberry-pi/odroid-setup.html#bitcoin-core-upgrade
SSH
What to do when on SSH I see "WARNING: REMOTE HOST IDENTIFICATION HAS CHANGED!"
This means that he public SSH key of the RaspiBlitz has changed to the one you logged in with the last time under that IP.
It's OK when happening during an update - when you changed the SD card image. If it's really happening out of the blue - check your local network setup for a problem. Maybe the local IP of your RaspiBlitz changed? Is there a second RaspiBlitz connected? It's a security warning, so at least take some time to check if anything is strange. But also don't immediately panic - when it's in your local network, normally it's some network thing - not an intruder.
To fix this and to be able to login with SSH again, you have to remove the old public key for that IP from your local client computer. Just run the following command (with the replaced IP of your RaspiBlitz): ssh-keygen -R IP-OF-YOUR-RASPIBLITZ or remove the line for this IP manually from the known_hosts file (see the path to the file in the warning message).
After that, you should be able to login with SSH again.
How do I unplug/shutdown safely without SSH
Just removing power from the RaspiBlitz can lead to data corruption if the HDD is right in the middle of a writing process. The safest way is always to SSH into the RaspiBlitz and use the "POWER OFF" option in the main menu.
But if you cannot login with SSH and you need to power off at least remove the LAN cable (network connection)first for sometime (around 10-30 secs - until you can see no more blinking lights on the HDD) and then remove the power cable. This should minimize the risk if data corruption in this situations.
I cannot connect via SSH to my RaspiBlitz. What do I do?
- Check the command again with how it shows on the display - do you have it typed in correctly?
- Replace
sshwithsudo sshand try it (laptop admin password might be required).
If that doesn't work, try to ping the IP of the RaspiBlitz with ping [IP-of-RaspiBlitz]. If you get no response on the ping requests and the device is not reachable, try this check list:
- Make sure that your RaspiBlitz and your laptop are really on the same local network
- Check if you have a VPN running on your laptop - some VPNs block local network
- Some Routers have
IP Isolationswitched on - not allowing two devices to connect
If you've checked those and SSH is still not working: Join the conversation on GitHub Issue #420.
How to SSH over Tor?
SSH is already encrypted, why would I want to use it with Tor?
- Remote access when away from LAN.
- Anonymized access - Someone sniffing the traffic don't know where the server you are establishing a connection is, not the server side knows where the client is.
Create Hidden Service:
bash /home/admin/config.scripts/tor.onion-service.sh ssh 22 22
SSH over Tor:
torsocks ssh admin@HiddenServiceAddress.onion
Get the address:
sudo cat /mnt/hdd/tor/ssh/hostname
How to setup port-forwarding with a SSH tunnel?
To use a public server for port-forwarding through a SSH tunnel you can use the following experimental script on the RaspiBlitz (since v1.2):
/home/admin/config.scripts/internet.sshtunnel.py
But first you need to make sure that the public server you are using is supporting SSH reverse-tunneling and authentication by public authorized key. Check the /etc/ssh/sshd_config on the public server. It should contain the following settings:
RSAAuthentication yes
PubkeyAuthentication yes
GatewayPorts yes
AllowTcpForwarding yes
ClientAliveInterval 60
ClientAliveCountMax 2
Last two parameters were added as used in the ssh tunnel demo at #GPN19 https://media.ccc.de/v/gpn19-76-einen-server-daheim-ohne-ffentliche-ipv4-adresse#t=911
You can add those at the end of the file, save and reboot.
On the RaspiBlitz you can then setup for example to forward the gRPC port 10009 (internal port) to the port 20009 on the public server (external port) with the user = test and server address = raspiblitz.com with the following command:
/home/admin/config.scripts/internet.sshtunnel.py on test@raspiblitz.com "10009<20009"
You can even set multiple port forwardings like with:
/home/admin/config.scripts/internet.sshtunnel.py on test@raspiblitz.com "10009<20009" "8080<9090"
Please be aware that after you set such a port forwarding you will need to set the domain of the public server as a DynamicDNS name (leave update url empty) and then connect mobile wallets fresh, or export the macaroons/certs again. When connecting the mobile wallets you may need to adjust ports manually after QR code scan. And if you SSH tunnel the LND node port 9735 you may also need to set the custom LND port script and maybe also a manual set of the domain in the LND service would be needed. This all is very experimental at the moment ... better integration will come in the future.
To switch this SSH tunneling off again use:
/home/admin/config.scripts/internet.sshtunnel.py off and also deactivate the DynamicDNS again.
To check if a tunnel is running on the tunneling server check: netstat -tulpn
How do I setup just a port-forwarding user on my public server?
Make sure the /etc/ssh/sshd_config has the following lines at the end:
RSAAuthentication yes
PubkeyAuthentication yes
GatewayPorts yes
AllowTcpForwarding yes
AuthorizedKeysFile  /etc/ssh/authorized_keys/%u
The last one stores all authorized_keys in one directory with a file per user. See https://serverfault.com/questions/313465/is-a-central-location-for-authorized-keys-a-good-idea#424659 To prepare this run:
mkdir /etc/ssh/authorized_keys
groupadd forwardings
To add a forwarding user run:
useradd -g forwardings -d /home [USERNAME]
echo 'command="date" [CONTENT-OF-RASPIBLITZ-ROOT-SSH-PUBKEY]' > /etc/ssh/authorized_keys/[USERNAME]
How to reset the ssh config and keys?
- shutdown the RaspiBlitz - if you dont have touchscreen activated, disconnect LAN cable, wait until HDD/SSD activity slows down (no constant blinking) and then cut the power
- take out the SD card and connect it to your laptop - it should appear as a
bootdrive - in the root directory of that
bootdrive create a file calledssh.reset - that file can be empty or just copy another file on that drive and rename it ()
- eject the drive from your laptop safely
- put SD card back into the RaspiBlitz (also make sure LAN cable is connected again)
- power up - the RaspiBlitz should boot up & reboot again
- then try again to SSH login
If you see a "REMOTE HOST IDENTIFICATION HAS CHANGED!" warning on login, that's what we wanted - the SSH cert of your RaspiBlitz changed - thats good. We just need to remove the old one from our laptop first - on OSX you can use rm ~/.ssh/known_hosts (deletes all cached server certs) or remove the line with your RaspiBlitz IP manually from the ~/.ssh/known_hosts file with a text editor.
Display
Can I flip the screen?
There is now an option under SETTINGS to rotate the screen.
To do it manually: For the default 3.5" LCD you need to edit the /boot/config.txt. Run sudo nano /boot/config.txt
Look for the line dtoverlay=tft35a:rotate=270 towards the end. To flip the screen with 180 degrees change the line to dtoverlay=tft35a:rotate=90 and reboot with sudo reboot. Reference: https://github.com/goodtft/LCD-show/issues/34
How to fix my upside down LCD after update?
Some displays have a different orientation. To fix this activate/deactivate the LCD-ROTATION option in the MAINMENU > SERVICES and let it reboot. You might need to do this up to 3 times until your display works correctly.
Can I run the RaspiBlitz without a display/LCD?
The display is one of the nice features of the RaspiBlitz but it can run without it. Maybe not all the add-on features can be used to the full extent, but you can get started without the LCD and if you wish, plug it on later.
If you want to use the HDMI output you can place a file called hdmi on the boot section of the RaspiBlitz SD card ... just connect the SD card to your laptop, create that file and then boot it up in the Raspberry Pi.
If you are already logged in you can use on the console the commands:
hdmi--> switch to HDMIlcd--> switch to LCD
How do I find the IP address when running without a display?
If you can login into your local internet router it should show you the IP address assigned to the Raspberry Pi.
Another way is to use Angry IP Scanner to find the IP address.
You can also put an empty file just called hdmi (without any ending) onto the SD card when connected to your laptop and then start it up on the Raspberry Pi. This will activate the HDMI port and if you connect a HDMI monitor to the Raspberry Pi it will show you the RaspiBlitz status screen containing the local IP address.
Debug
How do I generate a Debug Report?
If your RaspiBlitz is not working correctly and you like to get help from the community, it's good to provide more debug information, so others can better diagnose your problem.
When you use the WebUI in the browser than you can follow the steps:
- Login into the WebUI and enter the Dashboard (needs to be fully snyced)
- In the left navigation bar - choose "Settings"
- Under "Generate Debug Report" click "Generate"
- This might take some minutes, but then a Text-File will be offered for download
You can also get a debug report through the SSH menus:
- SSH into your Raspiblitz as admin user with your password A
- If you see the menu - use CTRL+C to get to the terminal
- To generate debug report run:
debug, optionally create a link withdebug -l - Then copy all output beginning with
*** RASPIBLITZ LOGS ***and share this
PLEASE NOTICE: Most private information (like IPs, node IDs, ...) will filtered from debug logs, but this might not catch all sensitive information - so recheck content yourself before you share publicly.
I have the full blockchain on another storage. How do I copy it to the RaspiBlitz?
Copying a already synced blockchain from another storage (e.g. your Laptop or external hard drive) can be a quick way to get the RaspiBlitz started or replacing a corrupted blockchain with a fresh one. Also that way you have synced and verified the blockchain yourself, and are not trusting the RaspiBlitz Torrent downloads (Don't trust, verify).
One requirement is that the blockchain is from another bitcoin-core client with version greater or equal to 0.17.1.
But we don't copy the data via USB to the device, because the HDD needs to be formatted in EXT4 and that is usually not read/writable by Windows or Mac computers. So I will explain a way to copy the data through your local network. This should work from Windows, Mac, Linux and even from another already synced RaspiBlitz.
Both computers (your Raspberry Pi and the other computer with the full blockchain) need to be connected to the same local network. Make sure that Bitcoind/bitcoin-qt is stopped on the computer containing the blockchain.
If your blockchain source is another RaspiBlitz v1.5 or higher - go to REPAIR > COPY-SOURCE.
If your RaspiBlitz is below v1.5 then on the terminal sudo systemctl stop Bitcoind and then go to the directory where the blockchain data is with cd /mnt/hdd/bitcoin - when the copy/transfer is done later reboot a RaspiBlitz source with sudo shutdown -r now.
If everything described above is in order, start the setup of the new RaspiBlitz with a fresh SD card (like explained in the README) - it's OK that there is no blockchain data on your HDD yet - just follow the setup. When you get to the setup-point Getting the Blockchain choose the COPY option. Starting from version 1.0 of the RaspiBlitz this will give you further detailed instructions how to transfer the blockchain data onto your RaspiBlitz. In short: On your computer with the blockchain data source you will execute SCP commands that will copy the data over your local network to your RaspiBlitz.
Once you finished all the transfers, the RaspiBlitz will make a quick-check on the data - but that will not guarantee that everything in detail was OK with the transfer. Check further FAQ answers if you get stuck or see a final sync with a value below 90%.
Bitcoind tells me to reindex - how can I do this?
To find/access information fast in large data sets like the Bitcoin blockchain indexes are needed. Those indexes can get corrupted on your HDD/SSD and to repair them they need to be rebuilt - re-indexed. Bitcoind has two different options to do this - a fast way called "reindex-chainstate" (which just rebuilds the UTXO set from the blocks as you have them) and the slow but complete way called just "reindex" that would even recheck all your block data - see for details here: https://bitcoin.stackexchange.com/questions/60709/when-should-i-use-reindex-chainstate-and-when-reindex
So if you read in your debug logs of Bitcoind that you should "reindex" you can try first just to do a fast "reindex-chainstate" and if that didnt worked a slow and full "reindex".
See the Raspiblitz script ./config.scripts/network.reindex.sh or the REPAIR menu to start these processes.
Why is my "final sync" taking so long?
First of all if you see a final sync over 90% and you can see from time to time small increase - you should be OK ... this can take a looong time to catch up with the network. Only in the case that you actively choose the SYNC option in the Getting the Blockchain is a final sync under 90% OK. If you did a torrent or a copy from another computer and you are seeing under 90% something went wrong, and the setup process is ignoring your prepared Blockchain and doing a full sync - which can almost take forever on a Raspberry Pi.
If something is wrong (like mentioned above) then try again from the beginning. You need to reset your HDD for a fresh start: SSH in as admin user. Abort the final sync info with CTRL+c to get to the terminal. Then run sudo /home/admin/XXcleanHDD.sh -all and follow the script to delete all data in HDD. When finished power down with sudo shutdown now. Then make a fresh SD card from image and this time try another option to get the blockchain. If you run into trouble the second time, please report an issue on GitHub.
How do I backup my Lightning Node?
There are two ways of performing a Backup:
1) Securing your On-Chain- and Channel-Funds during Operation
This is best done by auto backing-up the 'channel.backup' file to a remote location. But it just secures the funds you have in your on-chain wallet or in your channels. On recovery the channels will get closed. For details on how to setup see the README: https://github.com/raspiblitz/raspiblitz/blob/v1.2/README.md#backup-for-on-chain---channel-funds
2) Making a complete LND data backup��
This backups all your LND data - including all open channels. But it's just intended to use when you move your LND data between computers, during update situations, or in rescue recoveries, because replaying out-dated backups can lead to the loss of all channel funds.
To backup LND data in a rescue situation see next question "How can I recover my coins from a failing RaspiBlitz?".
How can I recover my coins from a failing RaspiBlitz?
On a RaspiBlitz you have coins in your on-chain wallet (bitcoin wallet) and also coins in lightning channels. First we will try to recover all of them while trying to keep your channels open with "Recover LND data". If that is not possible you can fall back to the second option "Recover from Wallet Seed".
1) Recover LND data
The best chance to recover all your LND data/channels is when you still can SSH into the RaspiBlitz and the HDD is still usable/reachable (mounted) - even if it shows some errors. If this is not possible anymore you should skip to the second option "Recover from Wallet Seed" or try to recover the LND data from the HDD (directory lnd) from another computer.
If you still can SSH in and HDD is readable, we can try to rescue/export your LND data (funds and channels) from a RaspiBlitz to then be able to restore it back to a fresh one. For this you can use the following procedure ...
To rescue/export your Lightning data from a RaspiBlitz (since v1.1):
- SSH into your RaspiBlitz and EXIT to terminal from the menu.
- then run:
/home/admin/config.scripts/lnd.backup.sh lnd-export-gui - follow the instructions of the script.
This will create a lnd-rescue file (ends on gz.tar) that contains all the data from the LND. The script offers you a command to transfer the lnd-rescue file to your laptop. If the transfer was successful you can now setup a fresh RaspiBlitz. Do all the setup until you have a clean new Lightning node running - just without any funding or channels.
Then to restore your old LND data and to recover your funds and channels:
- SSH into your new RaspiBlitz and EXIT to terminal from the menu.
- then run:
/home/admin/config.scripts/lnd.backup.sh lnd-import-gui - follow the instructions of the script.
This script will offer you a way to transfer the lnd-rescue file from your laptop to the new RaspiBlitz and will restore the old data. LND then gets restarted for you, and after some time it should show you the status screen again with your old funds and channels.
Be aware that if backup is some hours old, channels could have been closed by the other party and it may take some time until you see funds back on-chain. If backup is somewhat older than 1 day also the channel counter-parties may have used your offline time to cheat you with an old state. And if your backup was not the latest state it could also be happening that you are posting an old channel state (seen as cheating) and funds of that channel get forfeited as punishment. So again .. this backup method can be risky, use with caution. While it's recommended to try in recover and rescue situations - it's not for regular backups.
2) Recover from Wallet Seed
Remember those 24 words you were writing down during the setup? That's your "cipher seed" - These words are very important for recovering your wallet. If you don't have them anymore: go back to option "Recover LND data" (see above) and check all possible ways to recover data from the HDD. If you still have the word seed: good, but read the following carefully:
With the word seed you can recover the on-chain funds that LND was managing for you - but it does not contain all the details about the channels you have open - it's mostly the key to your funding wallet. If you were able to close all channels or never opened any, then you should be safe: The best results to recover on-chain funds from wallet seeds have been reported from people installing the Lightning Labs App on laptop and then using the wallet seed (and same wallet passwords): https://github.com/lightninglabs/lightning-app/releases. Other people were successful in this process using the Zap Desktop wallet (OSX, Win, Linux): https://zap.jackmallers.com/download
If you had open channels it would be best to check if you have also the channel.backup file (Static-Channel-Backup feature).
- SetUp a fresh RaspiBlitz (fresh SD-Card image and clean HDD).
- During the new SetUp, when you get to the point of creating the LND wallet (see image below).
- Choose
OLD - I had an old Node I want to recover/restoreoption and then - Choose
SEED+SCB - Seed & channel.backup fileoption - and follow the instructions to upload your
channel.backupfile and enter your seed
Then give LND some time to re-scan the blockchain. In the end you will have restored your funding wallet. You maybe need to wait for your old channel counterparts to force close the old channels until you see the coins displayed again.
If you don't have the channel.backup file but only the seed words there is a last hope - read this article:
https://medium.com/@guggero/did-you-lose-funds-on-the-lightning-network-because-of-a-disk-crash-8971b6a92494
Important: If you see a zero balance for on-chain funds after restoring from seed ... see details discussed here - you might try setup fresh this time with bigger look-ahead number.
How Can I Use Blixt Wallet to Rescue LND Funds with Seed Words and a Static Channel Backup (SCB)?
- Install Blixt Wallet from the App Store or Google Play Store.
- Restore your wallet using your 24-word seed phrase.
- Import the Static Channel Backup (SCB) file into Blixt Wallet.
- Verify the restoration of your channels and balances.
- Close channels manually if needed and monitor the on-chain transactions.
- Using Blixt Wallet with your LND seed words and SCB file provides a straightforward method to rescue your funds without needing a fully synced Bitcoin blockchain.
How do I change the Name/Alias of my lightning node?
Use the "Change Name/Alias of Node" option in the Lightning - LND Wallet Options menu. The RaspiBlitz will automatically reboot after this.
How do I change the public port LND/Lightning node is running on?
There is a experimental script you can call from the terminal that will make all changes for you ... see details here: https://github.com/raspiblitz/raspiblitz/issues/100#issuecomment-466722712
How do I solve a "signature mismatch after caveat verification" error?
If you get this error by LND it means that something is wrong with the macaroons being used to communicate with LND .. see: https://github.com/lightningnetwork/lnd/blob/master/docs/macaroons.md
Fixing this depends on where you get this error:
- If you get it in a mobile wallet, then redo the connection with the RaspiBlitz to get fresh macaroons.
- If you get this from RTL or from the scripts of the SSH menus of the RaspiBlitz, then go to "EXPORT Macacroons and TLS.cert" in SSH main menu and choose the the "RESET Macaroons & TLS" option.
Also make sure to check again on your power supply - it needs to deliver equal or more then 3A and should deliver a stable current. If you think your HDD is degrading - maybe this is a good time to replace it. See for details the FAQ question: How can I recover my coins from a failing RaspiBlitz?
Why is my node not routing?
- You don't have inbound liquidity
- Low uptime
- Capital is committed to competitive destinations
- Capital committed to destinations no one wants to send to
- Fees are too high
- Your inbound liquidity doesn't have good inbound liquidity itself
When using Auto-Unlock, how much security do I lose?
The idea of the "wallet lock" in general, is that your private key / seed / wallet is stored in a encrypted way on your HDD. On every restart, you have to input the password once manually (unlock your wallet), so that the LND can read and write to the encrypted wallet again. This improves your security if your RaspiBlitz gets stolen or taken away - it loses power and then your wallet is safe - the attacker cannot access your wallet.
When you activate the "Auto-Unlock" feature of the RaspiBlitz, the password of the wallet gets stored on the RaspiBlitz. So if an attacker steals the RaspiBlitz physically, it's now possible for them to find the password and unlock the wallet.
I connected my HDD but it still says 'Connect HDD' on the display?
Your HDD may have no partitions yet. SSH into the RaspiBlitz as admin (see command and password on display) and you should be offered the option to create a partition. If this is not the case:
Check/Exchange the USB cable. Connect the HDD to another computer and check if it shows up at all.
Windows: https://www.lifewire.com/how-to-open-disk-management-2626080
Linux/Ubuntu (desktop): https://askubuntu.com/questions/86724/how-do-i-open-the-disk-utility-in-unity
Linux/Raspbian (command line): https://www.addictivetips.com/ubuntu-linux-tips/manually-partition-a-hard-drive-command-line-linux/
How do I shrink the QR code for connecting my Shango/Zap/Zeus mobile phone?
Make the fonts smaller until the QR code fits into your (fullscreen) terminal. In OSX use CMD + - key. In LINUX use CTRL+ - key. On WINDOWS Putty go into the settings and change the font size: https://globedrill.com/change-font-size-putty
Why is my bitcoin IP on the display red?
The bitcoin IP is red when the RaspiBlitz detects that it cannot reach the port of bitcoin node from the outside. This means the bitcoin node can peer with other bitcoin nodes, but other bitcoin nodes cannot initiate a peering with you. Don't worry, you don't need a publicly reachable bitcoin node to run a (public) lightning node. If you want to change this however, you need to forward port 8333 on your router to the RaspiBlitz. How to do this is different on every router.
Some routers support a feature called UPnP where devices can automatically request a forwarding to be publicly reachable. By turning on BTC UPnP in the main menu SERVICES section, you can try if your router supports this feature.
On details how to set port forwarding manually on your router model see: https://portforward.com
Why is my node address on the display red?
The node address is red when the RaspiBlitz detects that it cannot reach the port of the LND node from the outside - when the device is behind a NAT or firewall of the router. Your node is not publicly reachable. This means you can peer+openChannel with other public nodes, but other nodes cannot peer+openChannel with you. To change this you need to forward port 9735 on your router to the RaspiBlitz. How to do this is different on every router.
Some routers support a feature called UPnP where devices can automatically request a forwarding to be publicly reachable. By turning on LND UPnP in the main menu SERVICES section, you can try if your router supports this feature.
On details how to set port forwarding manually on your router model see: https://portforward.com
Also the self-testing of the RaspiBlitz to see if the port is forwarded or not might not work if your router is not supporting Hairpinning.
Why is my node address on the display yellow (not green)?
Yellow is OK. The RaspiBlitz can detect that it can reach a service on the port 9735 of your public IP - this is in most cases the LND of your RaspiBlitz. But the RaspiBlitz cannot 100% for sure detect that this is its own LND service on that port - that's why it's just yellow, not green.
For details on how to set port forwarding on your router model see: https://portforward.com
How can I set a fixed IP?
Add an entry called staticIP in raspiblitz.conf to prevent external IP detection and force a fixed IP for your node.
How do I fix a displayed Error in my Config?
When the LCD is telling you to do a config check:
- go to the RaspiBlitz terminal (X on main menu) and run 'patch'
- start reboot with command: 'restart'
- go to the RaspiBlitz terminal run the command: 'check'
- now edit the RaspiBlitz config and get rid of the errors: 'nano /mnt/hdd/raspiblitz.conf'
- save config with: CTRL+o
- exit nano editor with: CTRL+x
- start reboot with command: 'restart'
Can I run the RaspiBlitz as Backend for BTCPayServer?
BTCPay Server is a solution to be your own payment processor to accept Lightning Payments for your online store: https://github.com/btcpayserver/btcpayserver
You can find setup instructions for a experimental setup here: https://goo.gl/KnTzLu
Thanks to @RobEdb (ask on Twitter for more details) for running his demo store with RaspiBlitz: https://store.edberg.eu - buy a picture of him and Andreas :)
I don't have a LAN port on my Laptop - how do I connect to my RaspiBlitz?
You don't need a LAN port on your laptop as long as you can connect over WLAN to the same LAN router/switch the RaspiBlitz is connected to .. and you are on the same local network.
Is it possible to connect the Blitz over Wifi instead of using a LAN cable?
A LAN cable is recommended because it reduces a possible source of error on the network connection side. But how to setup WLAN when you don't have a LAN-Router/Switch available see here:
To set up WiFi on the RaspiBlitz, you need to place a configuration file on the root directory of the SD card used to boot your Raspberry Pi. The RaspiBlitz checks for two specific files: wifi and wpa_supplicant.conf.
To store these files on the root directory of your SD card, you can use a computer with an SD card reader:
- Insert the SD card into your computer.
- Open the SD card directory (usually labeled as "boot" or similar).
- Create a
wifitext file (without an ending like .txt - just the name) on the root directory of the SD card (not inside any folders). - Within the file write the SSID (name of your WiFi network) on the first line and the WiFi password on the second line. Make sure there are no extra spaces or blank lines. Save this file and place it in the root directory of your SD card.
Example content of the wifi file:
YourWiFiSSID
YourWiFiPassword
When the RaspiBlitz boots up, it will check for the presence of the wifi file. If it finds the file, it will read the SSID and password and attempt to configure the WiFi connection. If the configuration is successful, the wifi file will be removed from the SD card, and a success message will be logged.
If an error occurs during this process, an error message will be logged, "errorWIFI" will be displayed on the LCD for one minute, and the system will shut down.
Can I directly connect the RaspiBlitz to my laptop?
If you have a LAN port on your laptop - or you have a USB-LAN adapter, you can connect the RaspiBlitz directly (without a router/switch) to your laptop and share the WIFI internet connection. You can follow this guide for OSX and this guide for Windows.
In short for OSX:
- make sure all VPNs are off (can interfere with local LAN)
- connect with LAN directly
- Settings > Sharing/Freigaben > activate "internet sharing" from WLAN to Ethernet
- Settings > Network > Ethernet-Adapter > set to DHCP
- in terminal >
ifconfigthere you should see the IP of the bridge100 - in terminal >
arp -aand check for an IP of a client to the bridge - in terminal > ssh admin@[clientIP]
In short for Windows:
- make sure all VPNs are off (can interfere with local LAN)
- connect RaspiBlitz with laptop LAN/ethernet directly
- Control Panel > Network and Internet > Network and Sharing Centre
- Click on your active internet connection highlighted in blue
- Properties > Sharing
- Check the box titled "Allow other network users to connect through this computer's Internet connection
- Select LAN/Ethernet from the "Home networking connection:" dropdown menu
- Click OK
- Restart the RaspiBlitz
If anyone has experience on doing this in Linux please share.
#rd## Are those "Under-Voltage detected" warnings a problem?
When your USB power adapter for the RaspiBlitz delivers too low of a power level, those messages with "Under-Voltage detected" (under-voltage) are shown on the display. This can lead to data loss/corruption on the HDD. If you see this just one or two times it's not OK, but can be in a tolerant window. Nevertheless, it is important to make sure that your USB power adapter can deliver at least 3A (big and stable is good). If you still see those warnings maybe get a second USB Power adapter just for the HDD, and power the HDD through a Y-Cable - see https://en.wikipedia.org/wiki/Y-cable#USB or put a USB Hub with extra power between the Raspberry and the HDD.
How do I return to the menu after exiting to the command line
Type the command raspiblitz to return to the main menu if you exited to the command line.
How do I setup fresh/clean/reset and without going into recovery mode?
When you put in a SD card with a new/clean RaspiBlitz image the RaspiBlitz will go into recovery mode because it detects the old data on your HDD and assumes you just want to continue to work with this data.
But there might be cases where you want to start a totally fresh/clean RaspiBlitz from the beginning. To do so you need to delete the old data from the HDD. Choose the option RESET-ALL under REPAIR to delete all data and start fresh.
When the HDD is clean, then flash a new RaspiBlitz SD card and your setup should start fresh.
My blockchain data is corrupted - what can I do?
You could try to re-index, but that can take a very long time - multiple days or even weeks. But there are other options:
- Get new Blockchain
Use REPAIR in the SSH main menu and then choose RESET-CHAIN. Then you get offered multiple options to get new blockchain data.
- Backup LND Data, make fresh Blitz, Replay LND Data
You can backup your channel and wallet data, make a complete fresh RaspiBlitz and after that is setup, you replace the LND data with your old data. Also make sure to check again on your power supply - it needs to deliver equal or more then 3A, and should deliver a stable current. If you think your HDD or SD card is degrading - maybe this is a good time to replace it. See for details the FAQ question: How can I recover my coins from a failing RaspiBlitz?*
I have two RaspiBlitz in my network - can they both be public?
Yes but you need to change the port number (for example to 9736) on at least one of your RaspiBlitzes - see how to change a port below. Then you can forward both ports from your home internet router to the matching RaspiBlitzes.
How can I enforce UASP mode for my SSD controller?
By default just tested & selected SSD encasings/controller are running enabled with UASP in RaspiBlitz. UASP brings a speed up for the SSD but also if not well supported by the SSD encasing/controller can lead to system halts. If you know for sure that your SSD encasing/controller is supporting UASP fully you can place a file called uasp.force on the SD card boot section after flashing the image with your laptop. See details or report errors on issue #2488
I am facing maintenance/emergency mode on boot. How do I fix it?
This behavior is caused by either the software that flashes the RaspiBlitz image onto the SD card, or by a faulty SD-card. The only solution is to try switching the software/computer you use for flashing and/or trying another SD card.
See issues #3039, #1053 & #782
Extras
How do I connect a UPS to the RaspiBlitz?
A UPS (Uninterruptible Power Supply) is used to protect the RaspiBlitz against power outages. Normally you put it just between your normal power outlet and your RaspiBlitz and you are set. But some UPS offer a way to communicate with devices. This can be very useful for example if on a longer power outage the battery of the UPS runs low the RaspiBlitz could detect this and power down in a clean way - instead of a sudden stop that risks data loss or corruption.
-
There is an experimental script to connect the RaspiBlitz to a UPS over USB cable build by APC - the Model tested with was APC Back-UPS BX - BX700U-GR but it should work with every APC model offering a USB port.
To turn it on run from terminal:/home/admin/config.scripts/blitz.ups.sh on apcusb -
There is also a script dealing with Geekworm/Suptronics X708 UPS HAT. The tested model was x708v1.2.
To turn it on run from terminal:/home/admin/config.scripts/blitz.ups.sh on x708
If you have other UPS models or ways to connect ... feel free to extend this script.
Can I run my RaspiBlitz on Solar Energy?
Yes - take a look at the project of Chimezie Chuta

More details in his book "A-Z of Building your own Full Bitcoin Lightning Node: A hand Book for Enthusiasts"
How to use the Let's Encrypt client
The Let's Encrypt client software acme.sh is included (since v1.6) and can be used to create TLS certificates that are signed by the Certificate Authority (Root CA) Let's Encrypt and which are therefore trusted on all modern platforms.
In order to successfully get a signed certificate you need to verify ownership over a DNS domain or a full
qualified domain name (FQDN). Currently Let's Encrypt doesn't issue certificates for IP addresses. The two
most common standards for verification of control are HTTP-01 and DNS-01.
The acme.sh client supports both modes and has a large number of DNS services (more than 50) it can interact with. More details can be found on the acme.sh wiki.
Let's Encrypt - HTTP-01
To use HTTP-01 your RaspiBlitz needs to be accessible directly from the Internet on a public IP address on port
80. If you don't have a public IPv4/IPv6 IP on either eth0 or wlan0 then it might be possible to use NAT port
forwarding or an autossh-tunnel to fulfill this requirement.
If everything (this includes creating a DNS A or DNS CNAME record that points to a static or dynamic IP address) is
set up so that the Let's Encrypt servers can reach your RaspiBlitz on port 80 then the following command will perform
the initial creation of a signed certificate and will also store the configuration data needed to regularly refresh it.
Just run this once and then lean back and forget about it. :-D
~/.acme.sh/acme.sh --keylength ec-256 --issue -d hostname.example.com -w /var/www/letsencrypt/
Let's Encrypt - DNS-01
The DNS-01 standard proves ownership by creating DNS TXT records on the domain or subdomain you want to use.
This requires interaction with and access to a DNS server but comes with the benefit that wildcard certificates
can be issued.
It is beyond the scope of this FAQ entry to explain all details of this - please refer to the official documentation. Assuming you are using the DuckDNS dynamic DNS service then the following command will get a certificate (including a wildcard subject alternative name (SAN) listing). It will also take care of continuous renewals.
export DuckDNS_Token="abcdefgh-0123-56ij-78kl-abcd9012efgh"
~/.acme.sh/acme.sh --issue --keylength ec-256 --dns dns_duckdns -d hostname.duckdns.org -d *.hostname.duckdns.org
As mentioned, more that 50 other services (including self-hosted options like e.g. nsupdate or PowerDNS) are supported.
Let's Encrypt - eMail Address
The installation process of the acme.sh client includes a prompt for an eMail address. The data entered there is
stored in the accounts.conf file as ACCOUNT_EMAIL. This address is used by Let's Encrypt to notify you about
the expiry of certificates (which is not really needed as renewals are automated) and also about changes to their
Terms of Service. For more details please check their privacy policy.
It is currently considered completely fine to leave this field empty and not provide an eMail address.
Let's Encrypt - Installation details
The acme.sh script is installed in /home/admin/.acme.sh/ - the configuration and the certificates are stored on the
external hard disk in /mnt/hdd/app-data/letsencrypt.
What is this mnemonic seed word list?
With the 24 word list given you by LND upon wallet creation you can recover your private key. You should write it down and store it at a safe place. Bear in mind that this 24 word mnemonic seed is not based on the BIP 39 and therefore cannot be recovered using a Bitcoin wallet.
For more background on the LND mnemonic seed read this article.
How do I set up VNC?
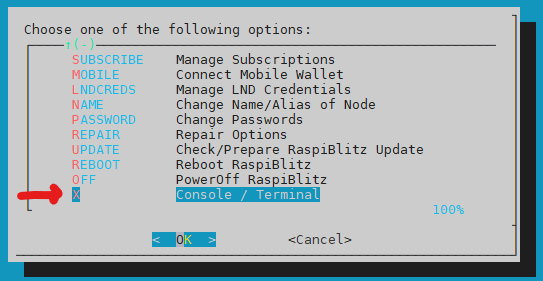
Enter the Console/Terminal by selecting the last option from the RaspiBlitz menu.
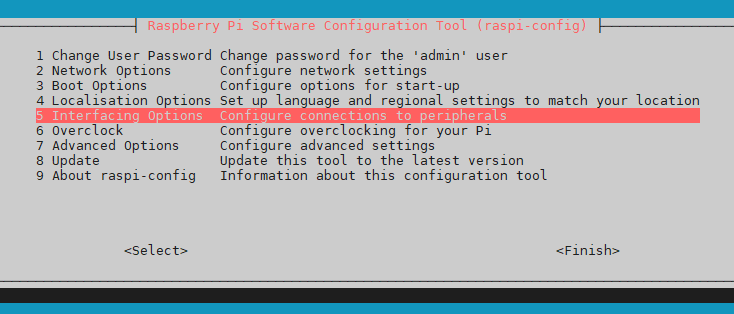
Enable the VNC server using raspi-config:
sudo raspi-config
In the menu, go to
Interfacing Options > VNC > Enable
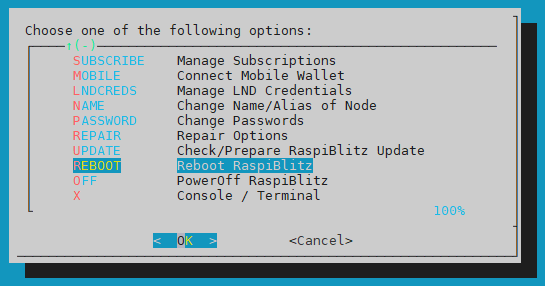
After that reboot the RaspiBlitz. You can do this easily from the RaspiBlitz menu.
In the command line, type:
menu
The RaspiBlitz menu has a reboot option if you scroll down. Select it and reboot.
After the RaspiBlitz is rebooted, set a password for the VNC Server:
sudo vncpasswd -service
Set the Authentication parameter:
sudo echo "Authentication=VncAuth" > /etc/vnc/config.d/common.custom
Restart the VNC Server for settings to take effect:
sudo systemctl restart vncserver-x11-serviced
Open the relevant port in the firewall (ufw):
sudo ufw allow vnc
Start the VNC server from the RaspiBlitz:
vncserver
This will run by default in the display number '1'. If you want to specify another number, run this (change <display-number> to whatever you prefer):
vncserver :<display-number>
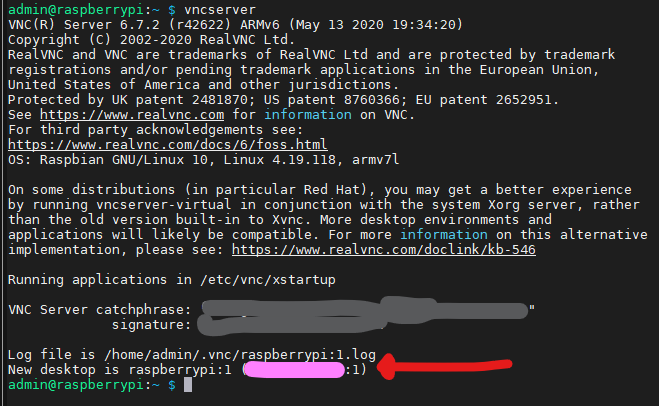
From the VNC client (e.g. your PC, laptop), connect to the IP that the previous command has displayed in the screen (I covered it in pink in the screenshot). If everything is alright, you can see the display from the VNC client now.
In order to stop broadcasting your display, stop the server from the RaspiBlitz with this:
vncserver -kill :<display-number>
For example:
vncserver -kill :1
Note: You may have to set the resolution through raspi-config in certain situations:
sudo raspi-config
Advanced Options > Resolution
Hint: From macOS, there is a built in VNC client hidden away at: /System/Library/CoreServices/Applications/Screen\ Sharing.app
Hint 2: Find more info about VNC in Raspberry here.
Why does RaspiBlitz does not support RAID or better file systems than ext4?
The RaspiBlitz project opts for simplicity, reliability, and maintainability over complexity. Using a single drive with a well-understood, mature file system (ext4) minimizes support burden, reduces the chance of user error, and keeps the system accessible for newcomers. More advanced storage setups (RAID, Btrfs, ZFS, etc.) introduce additional layers of complexity, edge cases, and maintenance overhead that are hard to support in a volunteer-driven, community project.
For users who need more sophisticated storage setups, the recommended path is to run RaspiBlitz on more powerful hardware and virtualized under something like Proxmox where those filesystems, backup and RAID features are much better supported and documented.
How to setup Raspberry Pi 4 with Heatsink Case
- Put screw mounts on the SSD shield.
- Prepare screws for mounting the Raspberry PI and corresponding heat sink.
- Apply thermal pads.
- Attach the heat sink and raspberry pi.
- Attach the foot that will later hold things in place.
- Make sure you use the right pins when mounting the display.
- Fasten the SSD so that it doesn't shake.
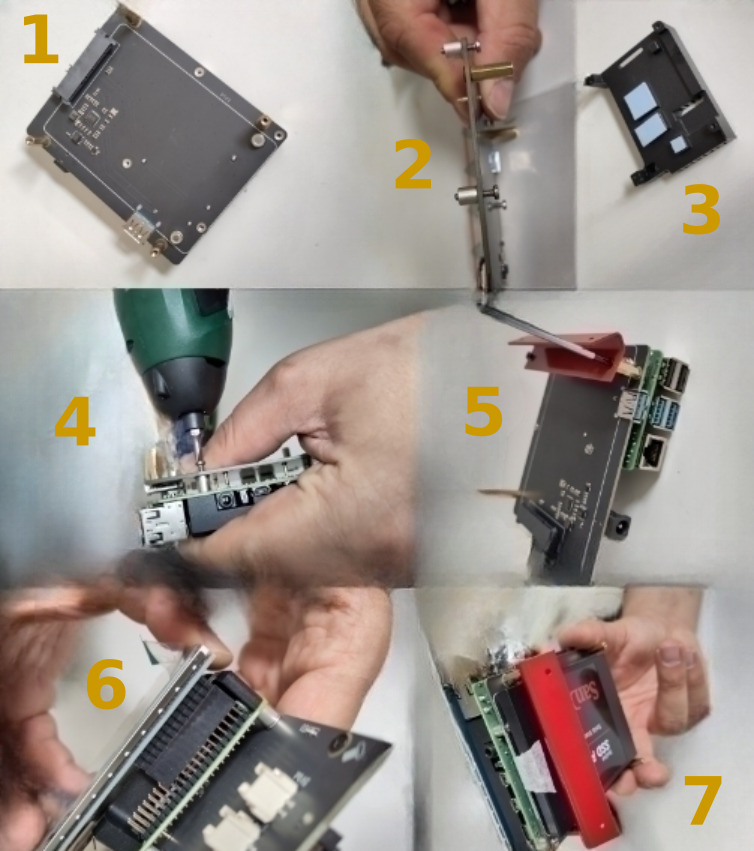
- Open the SD card slot.
- Attach everything to the case.
- Close the case.
- Connect the SSD with the raspberry pi.
- Insert the flashed SD card.
- Remember to use a tamper evident bag before entrusting a third party with physical access to the device.

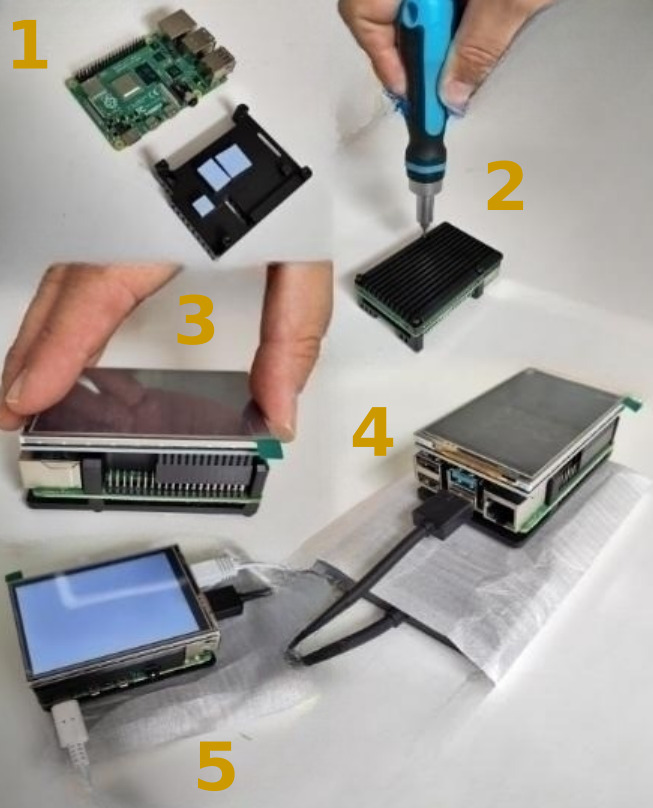
How to setup Raspberry Pi 4 with Metal Case
- Apply thermal pads.
- Close the case.
- Make sure you use the right pins when mounting the display.
- Connect the SSD with the raspberry pi.
- Plug your device into power and give it internet access to check if everything is working as expected.
Can I sell RaspiBlitz hardware and pay you?**
Yes, you are free to sell hardware running RaspiBlitz software as it is released under the MIT License, which permits commercial use. Please note that as an independent commercial seller, you are not representing the RaspiBlitz developer team. Just make sure your customers don’t get confused about this distinction in your advertising. While we don't enter into formal partnerships or contracts, we appreciate voluntary donations. Donations can be made through our donation page: raspiblitz.org/#donation. Contributions motivate us and often lead to us mentioning supportive shops in our documentation, following the "Value for Value" principle—those who add value to the project are recognized in kind. If you inform us about your contribution and your shop, we're also happy to mention or retweet about your initiative to support community engagement.